Affichage des articles dont le libellé est Blogger Addons. Afficher tous les articles

4 Change Blogger Mouse Cursors (+1000 Free Cursors) Easy Way

Change Blogger Mouse Cursors (+ 1000 Free Cursors ) Easy Way

I know a lot of blogger who want to control the look of every part of the blog, from template, to colors, font size, to style, and some people asked about changing the blogger mouse cursor, So today we are gonna talk about it in the easy way,


It can be done in only one step. Want to see a demo, then please click below and look how mouse is looking.


How to add it.

Go to your blogger account, And navigate to dashboard >> design >> edit html >>


And find the following code,

]]></b:skin>

And exactly before it, add the following code

body, a, a:hover {cursor: url(http://cursors1.totallyfreecursors.com/thumbnails/rainbow-ani.gif), progress;}

And now click "Save Template"

The above step will give you a mouse cursor just like the one in the above demo blog, And because the aim of this tutorial is to give you all control over your blog cursor, So you can just change the red part in the above code
To What ever cursor url you like, So the code should be

body, a, a:hover {cursor: url(Cursor-Url), progress;}

And the question now is how to get another cursors.


Free sources for +1000 ready to use mouse cursors.

On this 2 links you’ll find more than 1000 free and ready to use cursors well categorized, so you just browse and find your favorite one, once you found your favorite one, replace the red words in the above code with it’s url.


Related Titles:
How To Change Blogger Mouse Cursors In Easy Way ( + 1000 Free Cursors )
How To Change Mouse Cursor on Blogger.
how to change my cursor in my blog
change mouse cursor in blogger blog to animated cursors.


12 Add Share Buttons to custom templates Blogger

Share Buttons feature which makes it easier for your Blog visitors to bookmark, tweet, fshare, email , google+1, etc your post.


But, if you're using any custom blogger template. you may not see the widget appearing in blog. even though you activate it.

So, if you have that problem. here is how to fix it. (before making any changes..first backup your template)

7 How to add FOLLOWERS widget to blogger

How to add FOLLOWERS widget to blogger


You Want to know who regularly reads your blog and set up a public base of loyal readers for your blog?


So you must add this tool until it becomes its own blog FOLLOWERS


Add this gadget is very simple

login on your account Go to "Dessign" then "Page Elements"


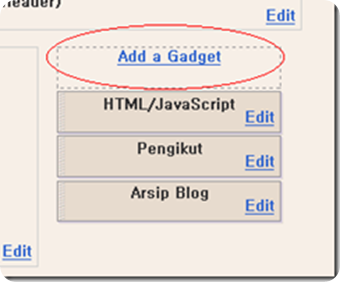
Click on the link "Add Gadget" which appears on the sidebar of the layout


In the pop-up window look for this tools "Followers" and click on it


Now you can save with the default style of your template


and you can choose a new style 


after you choose what you want click "save" and go to you blog
look the result , these is my result


one Follower "very bad result" -_^

We meet on another post,, Bye

4 Add a poll widget to your blog


On this simple post I will explain how to add a poll gadget for blogger

There are several ways to interact with your readers and visitors. The comments section for each post is one way for your readers to interact with you.

 But if you want to find out whether your readers like your template. Here you can not write a topic to know the opinion of visitors and readers through comments


The best way is to open a poll, ask for the opinion of visitors to a particular thing, for example,

0 Add the number of comments in the title


Subject is clear from the title, Is to explain how to add the number

of comments  in the title As in this Blog


Alawys before change any thing you should to take a backup of

your template.

Now go to " Edit HTML" click on "Expand Widget"

0 Add styled sharing dock widget

Hello all in a new addition to blogger

This add-on would make buttons participation in Dock style


add this widget is very simply, after loggin to your Dashboard


go to "Design", "pageElements" and "Add a Gadget"


Then


Now choose "HTML/JavaScrpit"

and put this code


<style type="text/css">
  #sharedock { position: fixed; bottom: 0; left: 0; width: 100%; height: 90px; z-index: 999; }
  #dock { position: relative; bottom: 0; font: 13px "Trebuchet MS", Verdana, Helvetica, sans-serif; }
  .dock-container { position: relative; background:url(https://blogger.googleusercontent.com/img/b/R29vZ2xl/AVvXsEh_TDxEizBr-bORB3e97L-hCKrv_L_TzwMmuEtLGZUXC-XLB6HwCKgncesQPeOgxhknh1wt_ilHhyphenhyphenHo1yADovZA4rk5jwXs0wE3wenIJeImnE5xeMPHrXKUwHcAD6AeHljqoMRKWrW7Ag8/s1600/0.gif) no-repeat bottom center; height: 50px; padding: 20px 0 20px 0; }
  .dock-container .custom_images a { display: block;  position: absolute; bottom: 0; text-align: center; text-decoration: none; color: #333; cursor: pointer; }
  .dock-container .custom_images span { background: rgba(0,0,0,.75); display: none; padding: 2px 8px; margin-left: 17px; font-size: 11px; color: #fff; -moz-border-radius: 10px; -webkit-border-radius: 10px; }
  .dock-container .custom_images img { border: 0; margin: 5px 0px 10px 0px; width: 100%; }
  </style>
 
<div id="sharedock">
  <div id="dock">
  <div class="dock-container">
 
<div class="addthis_toolbox"> 
 
 <div class="custom_images">
 
 <a class="addthis_button_facebook"><span>Facebook</span><img src="http://addthis.com/cms-content/images/gallery/aquaticus_facebook.png" alt="Share to Facebook" /></a>
  <a class="addthis_button_twitter"><span>Twitter</span><img src="http://addthis.com/cms-content/images/gallery/aquaticus_twitter.png" alt="Share to Twitter" /></a>
<a class="addthis_button_myspace"><span>MySpace</span><img src="http://addthis.com/cms-content/images/gallery/aquaticus_myspace.png" alt="Share to MySpace" /></a>
<a class="addthis_button_stumbleupon"><span>Stumble</span><img src="http://addthis.com/cms-content/images/gallery/aquaticus_stumbleupon.png" alt="Stumble It" /></a>
<a class="addthis_button_reddit"><span>Reddit</span><img src="http://addthis.com/cms-content/images/gallery/aquaticus_reddit.png" alt="Share to Reddit" /></a>
<a class="addthis_button_delicious"><span>Delicious</span><img src="http://addthis.com/cms-content/images/gallery/aquaticus_delicious.png" alt="Share to Delicious" /></a>
  <a class="addthis_button_more"><span>More...</span><img src="http://addthis.com/cms-content/images/gallery/addthis_64.png" alt="More..." /></a>
  </div>
  </div> 
  </div>
  </div>
  </div>
 
  <script type="text/javascript" src="http://s7.addthis.com/js/250/addthis_widget.js"></script>
  <script type="text/javascript" src="http://ajax.googleapis.com/ajax/libs/jquery/1.3.2/jquery.min.js"></script>
  <script type="text/javascript" src="http://addthis.com//cms-content/images/gallery/fisheye-iutil.min.js"></script>
  <script type="text/javascript">
  $(function () { 
  // Dock initialize
  $('#dock').Fisheye(
  {
  maxWidth: 30,
  items: 'a',
  itemsText: 'span',
  container: '.dock-container',
  itemWidth: 50,
  proximity: 60,
  alignment : 'left',
  valign: 'bottom',
  halign : 'center'
  }
  );
  });
  </script>


save and go to your blog show the add-on


If did not work with you this way , try with this


go "Edit HTML"


and look for this

</body>

just before it past the code the above-mentioned


the result will be a nice sharing buttons in your blog


When you pass the mouse icon will be move 


live demo from here : LIVE DEMO

0 add live traffic widget for blogger

how to add live traffic widget for blogger


Special add-on


This service is provided from the site


First, after entry to the site put pressure on the choose your feedjit

Then put pressure on the sing up for free "Feedjit Completely Free"

Then file out : Name, email etc.

Then be transferred to:


1- Choose Ready models style and color That correspond to your site


2- Choose new models Model of your choice


3- select widget width


4- The number of visitors who will appear


5- choose your Platform 


qnd click "GO" the widget will be added automatically


0 Add "Page loaded in ..." For blogger

Add "Page loaded in ..." For blogger


Today with a light added is They show the page load time , as in this picture


This add-on is very easy
As usual we go to control panel, Design and Edit HTML

 - 


First thing take a backup of your template.
click "Expand Widget Templates"
and look for this words
<Head>
 and past this code  under it
<!-- page load timer -->
<script type='text/javascript'>
var d = new Date();
var starttime = d.getTime(); //Get the start time
</script>
now look for this :
</body>
and past just before it this code :
<!-- page load timer start by a4why.blogspot.com -->
<script type='text/javascript'>
var d2 = new Date();
var endtime = d2.getTime(); //Get the end time
//Find the difference between the start and end times
var totaltime = (endtime - starttime)/1000;
//Round 2 decimal places
var result = Math.round(totaltime*100)/100;
//Output results to a &quot;P&quot; element
document.getElementById(&quot;loadtime&quot;).innerHTML = &quot;Page loaded in: &quot;+ result +&quot; seconds&quot;;
</script>
<!-- page load timer end by a4why.blogspot.com-->
 save the template
   

  then go to "pageElements"


and add a gadget "HTML/JavaScrpit"
Put This code and save
<!-- Widget portion -->
<p id="loadtime">a4why.blogspot.com</p>
change "a4why.blogspot.com" with what you want

The result will be show the time of loaded the page In the place that you put the gadget


0 Add a floating Share Buttons to your blog

How to add a floating Share Buttons to your blog

This addon floating moving with the move of the page


First thing take backup of your template.

After logging on the control panel and then design, then edit the Html,

 --->

Look for this code


]]></b:skin>


And Paste this code before it
#sharebox {background-color:#FFFFFF;border-color:#C1CDCD;border-style:solid;border-width:1px;left:103px;bottom:40px;margin-top:10px;position:fixed;width:64px;}#sharebox .float {margin:7px}.FBConnectButton_Text{font-size: 8px;padding:2px 4px 3px !important;}


Then look for the following line:


<div class='post-header-line-1'/>

just before it, paste this code

<b:if cond='data:blog.pageType == &quot;item&quot;'><div id='sharebox'><div class='float'><script src='http://tweetmeme.com/i/scripts/button.js' type='text/javascript'/></div><div class='float'><a href='http://www.facebook.com/sharer.php' name='fb_share' type='box_count'>Share</a><script src='http://static.ak.fbcdn.net/connect.php/js/FB.Share' type='text/javascript'/><div class='clear'/></div><div class='float'><a class='google-buzz-button' data-button-style='normal-count' href='http://www.google.com/buzz/post' title='Post on Google Buzz'/><script src='http://www.google.com/buzz/api/button.js' type='text/javascript'/></div><div class='float'><script src='http://www.stumbleupon.com/hostedbadge.php?s=5'/></div></div></b:if>

Then press to save the template 

6 Add Linkedin Share Button with to Blogger

How To Add "Linkedin" Share Button with in Posts Blogger


as twitter doing his Button official post share on Twitter

The Giant linkedin Announce, as announced by Twitter

Put buttons formal participation for blog posts and threads through the site, and those who do not know the site, it is a social network like facebook, but it is used by more businessmen and traders, in the sense that if your blog or website contains articles on business or shopping for a product, you can bring a lot of visitors and buyers across the This magnificent site is through the participation of your posts 

Most Viewed

Share

Twitter Delicious Facebook Digg Stumbleupon Favorites More